How to create a vocabulary list blog post
As one of your assignments for this class, you are responsible for creating a blog post with all the vocabulary and definitions for one week of the course. This blog post will explain how you can create and publish that blog post on our course website.
Create the blog post
Update your fork of the website
You should have already forked our website to add your details for the “Person” section. You can use this same fork to add your blog post, but you should make sure you get your fork up-to-date with the current version of the website before you do.
A fork of a repository does not stay up-to-date with the original repository it copied by itself. Instead, unless you update it, it will continue to be a snapshot of the original repository (plus any changes you’ve made to your copy) as of the time when you forked it. If the original has made a lot of changes since you made your fork, it might be very hard to make a clean pull request as there will be (potentially) lots of conflicts because of changes made to the original. It’s considered polite to make sure that you’re working with an up-to-date fork of a repository if you want to make a pull request back to the original.
To update your fork of the original repository, open your “csu_msmb.Rproj” file to open our website’s R Project on your computer. This should open RStudio with the website’s project open (check the top right corner of your RStudio window to confirm—it should say “csu_msmb”).
There is a little blue gear symbol in the “Git” pane in RStudio. Click on the down arrow to the right of it and select “Shell…”. This should open a bash shell on your computer. (If your computer uses Windows, there’s a chance that it might open something other than a bash shell. In that case, you can change your preferences in RStudio to reconfigure to always use a bash shell terminal when you ask for a shell from RStudio.)
In this shell, you need to run two git commands. First, you’ll add a remote branch
to your repository. You already have one remote branch called “origin”—that’s the
GitHub repository that you have in your account, which you forked from the original.
Now you’ll add the original (the GitHub repository in my account) as another remote
branch. Each branch has its own name, and you can use that name to refer to it in later
git commands. The convention, if you add an original repository that you forked from
as a remote, is to name that remote branch “upstream”. Run the following code in your
bash shell to add the original GitHub repository as a remote branch with the name
“upstream”:
git remote add upstream git@github.com:geanders/csu_msmb.gitNow that you have added the original as a remote, you can pull in any commits that were
made to it since you originally forked it. There are a few ways you can do that, but one
way to do it in one step is with git’s pull command. This fetches the changes and merges
them into your local version of the repository, all in one step. Run the following code in
your bash shell to do that:
git pull upstream masterIdeally, all this will have worked seamlessly (if not, check with the faculty and we can help you troubleshoot). Close your bash shell and check your version of the “csu_msmb” project to see if it looks like it’s up-to-date with the original. You can go to the “Commit” button in the “Git” tab, and there is a “History” selection in the window that pops up. Look through that and make sure that you see recent commits to confirm that your version is now up-to-date.
Finally, this has updated your local version, but not your GitHub remote. Go ahead and use the green up arrow in RStudio’s “Git” pane to push your updated local version up to GitHub. Now both your local (“master”) and remote (“origin”) branches should be up-to-date with our original version, so it will make it much easier to merge in your changes.
If you’d like to learn more about this process, there’s a really nice blog post here.
Making a new blog post
In blogdown, each blog post is an RMarkdown document. The stuff at the very top
of the file (the YAML with details like the title and author) will look a bit
different than plain RMarkdown files, but once you get into the body of the post,
you should find that the rules are very similar to RMarkdown.
You will be creating a blog post that will include a table with the vocabulary
list as well as a few other elements. There are a few ways you can add a new
blog post file in blogdown. You’re welcome to use any method you’d like, but
if you’re not sure where to start, this is one way.
Make sure that you have RStudio open to the project for our course’s website. If you
do, you should see csu_msmb in the upper right hand corner of your RStudio session.
(If not, go to File -> Open Project... and navigate through your file directory
to your local version of our project directory and open the csu_msmb.RProj file there.)
Next, you can use an RStudio “Addin” to make a new blog post using a nice user
interface. These Addins are all alternatives to things you could do with a
function call in R, but the Addin often provides a more immediately
user-friendly interface for you to enter options. For example, the Addin for
creating a blog post does all the actions of a blogdown function called
new_post, but instead of needing to remember the parameter name to use for the
author listing and the title and all that, you can just fill the information
into a nice form and go from there.
To find the new post Addin, look at the top of your RStudio session window. You should see “Addins” with a down arrow beside it. Click on the down arrow. When you do, you should see a “New Post” option. Select this option. A form should pop up with spaces for you to fill in the title, author, and some other details.
Fill this form out in the following way:
- Title: This should be “Vocabulary for Chapter [x]”, but with “[x]” replaced with your chapter number.
- Author: Make sure you put your name exactly as listed in the “People” section of the website. This will help the website generator connect this post with your user profile, so when someone reads it they’ll get your picture and a link to find out more about you at the end of the post.
- Date: This is where you put the publication date of your blog post, and it has a pretty cool feature. Even if you write your blog post earlier, the post will not be published on the blog until the date listed in this section. That means that you can start writing your blog on one day but know that it won’t show up online until later. It also means you can start work on your blog, but a half-finished draft won’t show up online until you get to the publication date. For right now, set the current date in this section, so that your blog post will show up locally as you work on it, but later you’ll actually change this date so that, when you submit your pull request, your post won’t show up until the faculty have had the chance to suggest some changes and for you to make any needed fixes.
- Categories and tags: For both the “Categories” and the “Tags”, be sure to
include
vocabularyandChapter [x](with [x] replaced with your chapter’s number). These tags will let everyone on our website quickly find all the blog posts on your chapter or all the vocabulary lists. - Format: You have several choices for the type of file to use to write your blog post. Since we’re going to be using some R code to make the table look pretty, you’ll need to pick one of the options that allows for R code chunks, so that rules out plain Markdown. I recommend that you use “.Rmd”.
Once you make these entries, click the button labeled “Done”. This creates an RMarkdown file for your blog post and opens it for you. Here’s an example of me doing this process if I were writing the vocabulary list for Chapter 16:
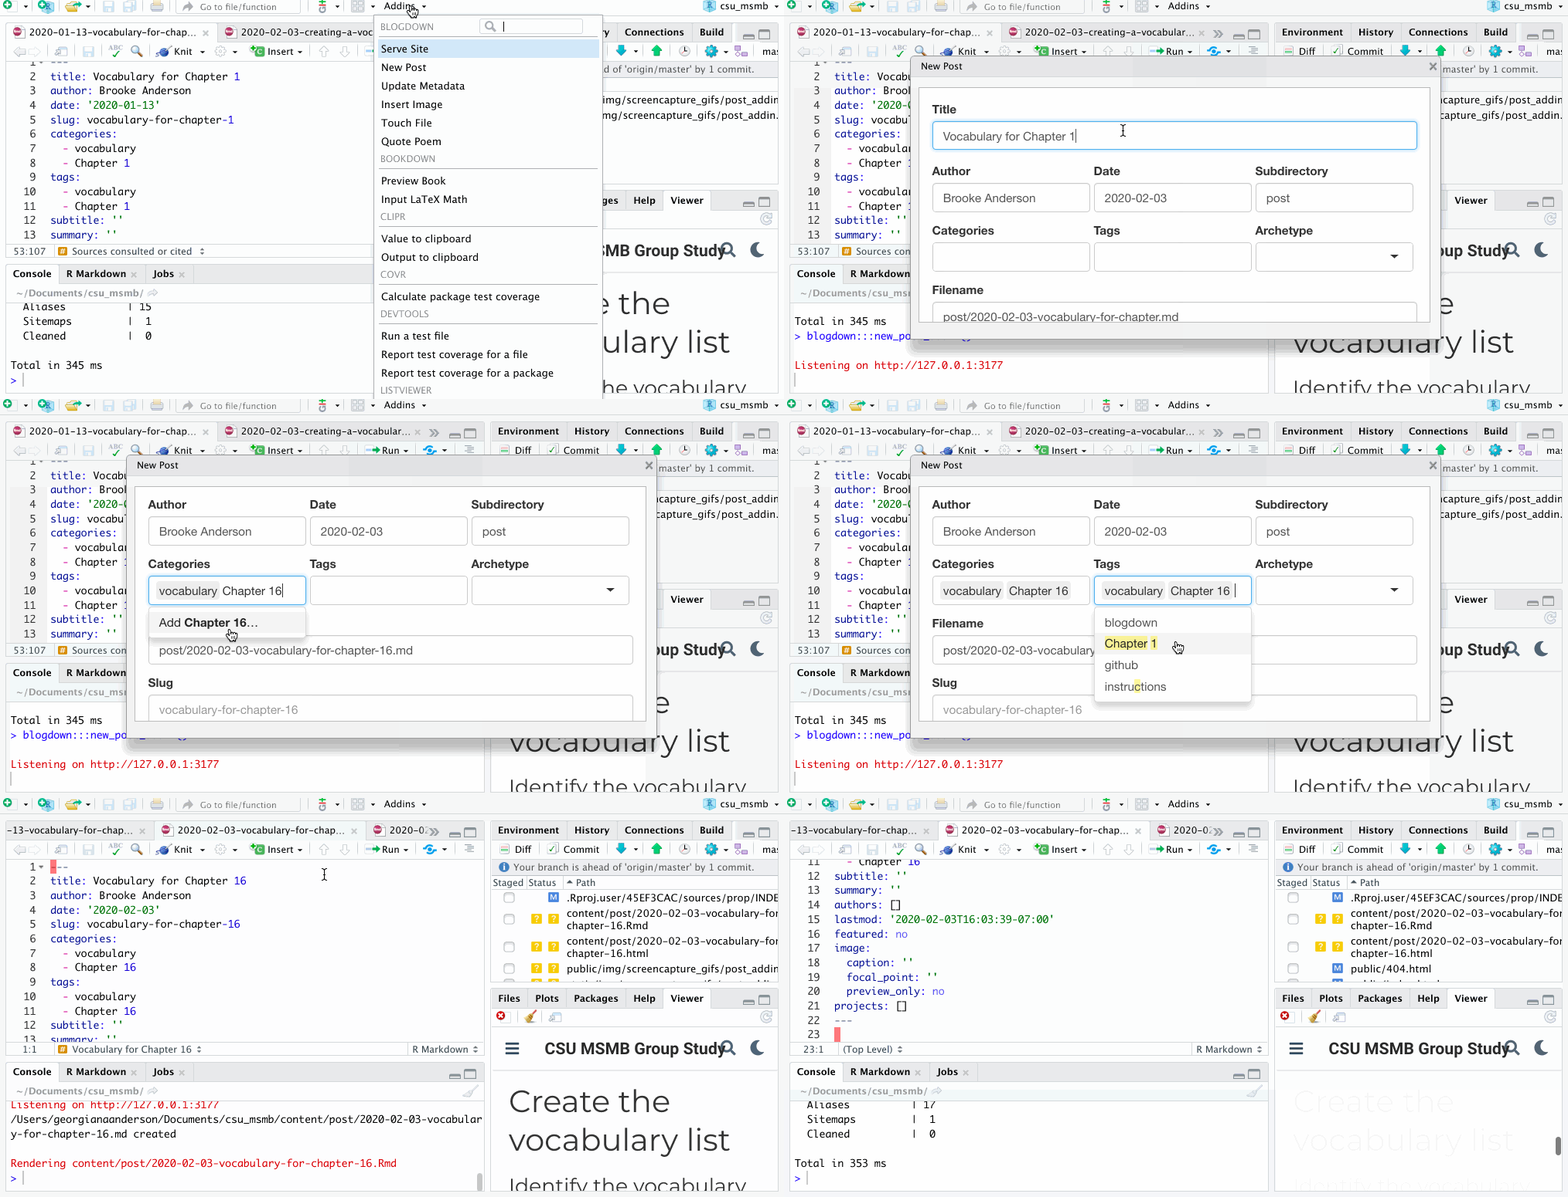
You can see, in the RMarkdown file that’s created and opened, that all these details end up getting inserted into the YAML at the top of the RMarkdown file. If you ever need to change anything (like the date or the title), you can change it here in the RMarkdown file. Do so carefully, though—YAML can be pretty picky about things like spacing and special characters (hyphens, for example).
If you ever need to find this file later, all of the blog posts are saved in a
special place in our project’s directory: in the content subdirectory, there’s
a subdirectory called post that contains both the RMarkdown files used to
write the posts and the output (an HTML file) that is created by the RMarkdown
each time you save the file. You might notice that they all have long file
names—the file name for a blog post is a combinataion of its publication date
and its “slug”, which is some abbreviation of the original title. If you really
want, you can change what the slug will be when you first create the blog post,
but I don’t think you really need to.
Writing in the blog post
Within the body of the blog post RMarkdown file (in other words, below the
--- that marks the end of the YAML section), you can write the blog post
just as you would any RMarkdown document. This means that you can use
things like ** to mark bold text, * for italics, and #, ##, etc., for
section headings.
It also means that you can insert chunks of R code that will run and add
their output within the post. Unlike in regular RMarkdown, you usually won’t
have to press the Knit button to knit the document. Instead, the blog post
should re-knit every time you save the file. You can check to see by looking
at the Viewer pane to look at the current version of the site (if it doesn’t
show the site automatically, load the blogdown package and then run
serve_site).
If you have not worked much with RMarkdown before, you might want to check out some references on how it works. There are several great articles on the RMarkdown website that can help.
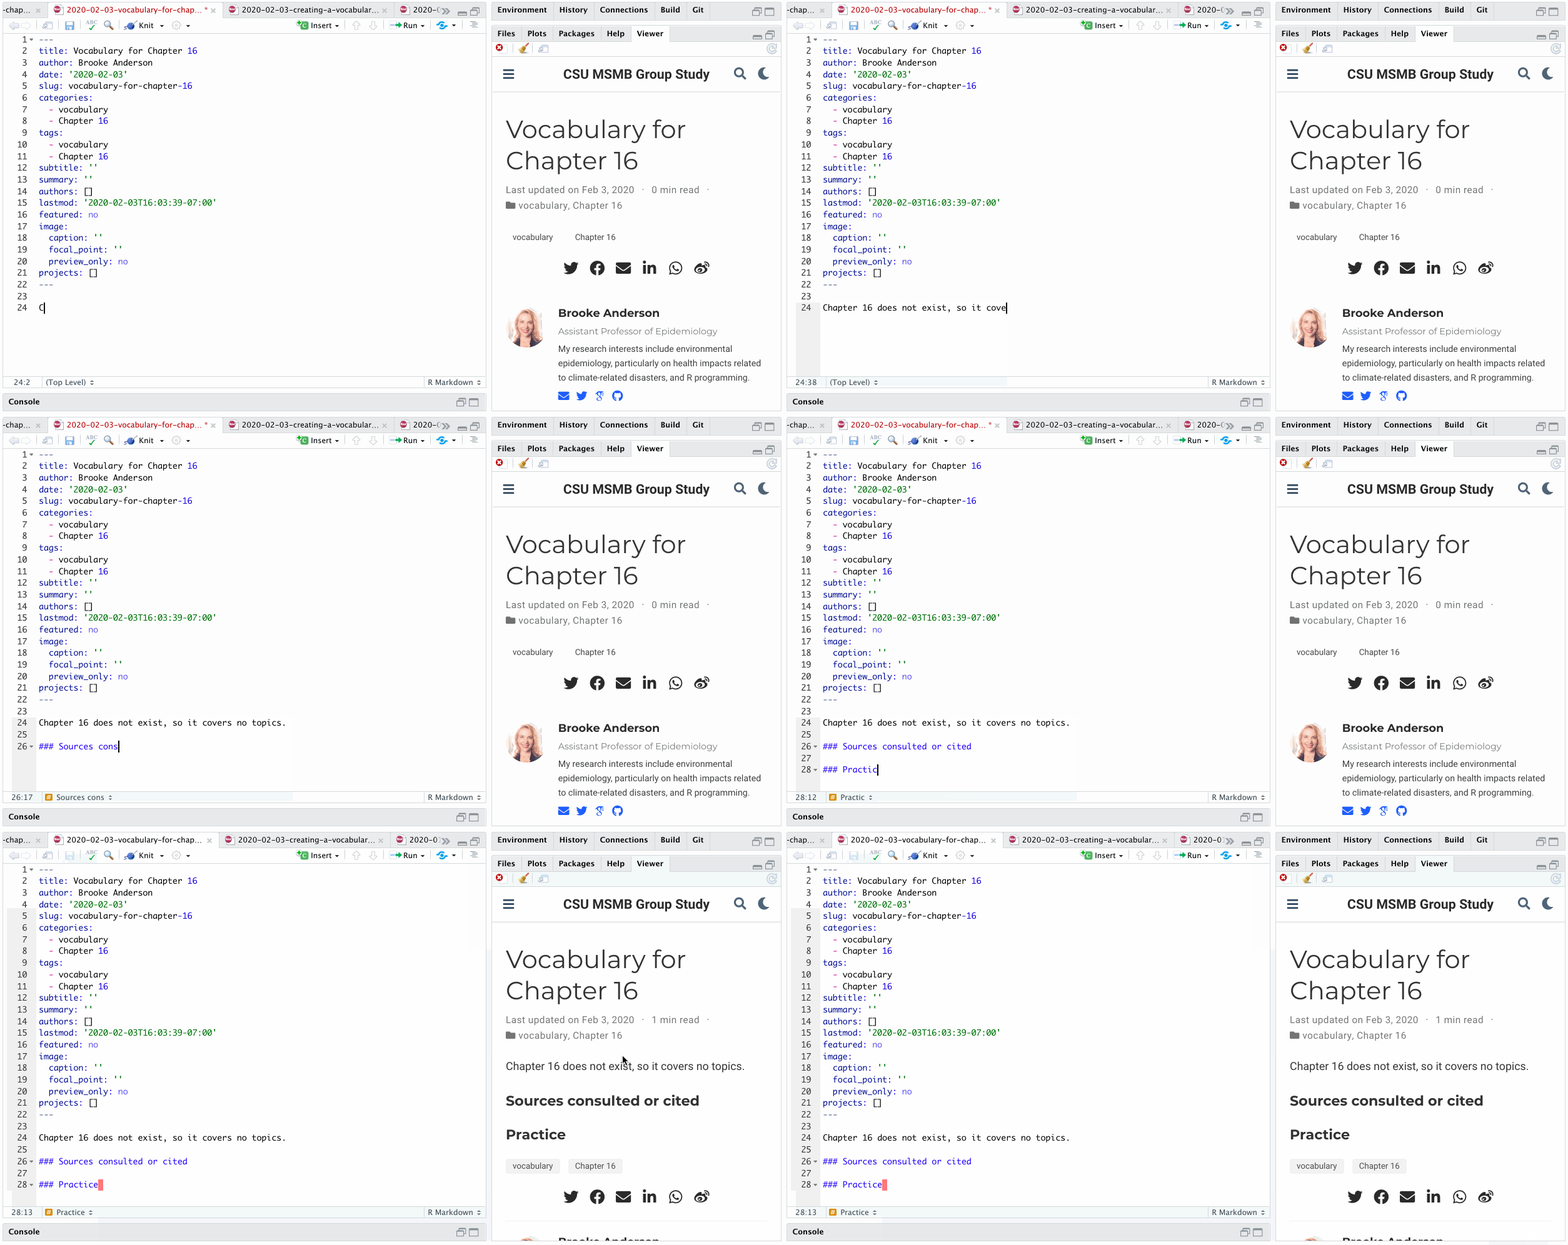
In your blog post, go ahead and draft a first paragraph that describes the
key concepts covered in the chapter. Also, create third-level section headings
(i.e., use ### to mark the section heading) for “Sources consulted or cited”
and “Practice”. Save your blog post file and check to see if these changes
have been made in the version of the website in your Viewer pane!
Create the vocabulary list
Now, for the content of your post. You’ll be creating a vocabulary list, as well as embedding a Quizlet practice app, so that your classmates can learn the vocabulary for the chapter. This list will be what everyone is responsible for in the weekly vocabulary quiz.
You can see an example of a vocabulary blog post for Chapter 1. You can use this as a template for your own post.
Identify the vocabulary terms you need to define
First, you will need to decide which words from the chapter to define. We expect that you will include all the bolded terms for your chapter. Here are some guidelines for deciding on the vocabulary terms to define for your chapter:
- You should include all words in the chapter that are given in bold. Be sure to look for bolded terms in the sidenotes and end-of-chapter exercises, too! Occassionally, the authors use bold for subheadings (see the “Why R and Bioconductor?” section in the Introduction or the “Summary of this chapter” section of Chapter 1). These subheadings do not need to be included in the vocabulary list for the chapter.
- If you find one or more common synonyms for a term, you can include that with the term in the list (e.g., “variability / spread / dispersion”).
- Feel free to change a term from singular to plural or vice versa if it helps you in writing the term’s definition. Similarly, if the bolded term does not include all the words that would be helpful (e.g., the bolded term is “sufficient”, but the term of interest is “sufficient statistic”), you can add a word or two to the bolded term.
- The bolded terms in the book tend to favor statistical terms over biological ones. If there are some biological terms you needed to look up when you read the chapter, or that you think some people in the class might not know, feel free to add them to your vocabulary list.
Create a .tsv file with terms and definitions
While you could directly add the vocabulary into an RMarkdown table, we are asking you
to save it into a plain text .tsv file, which will then be read into the RMarkdown
document to form a table. We doing this because it creates a few advantages. First,
if we have the vocabulary list in a dataframe (which we get when we read it in from
a plain text file), we can use some cool R packages to format the table nicely, without
having to learn loads of new Markdown or HTML formatting tricks. Second, we want to also
use the vocabulary list as input to a Quizlet list, which
will let us embed a practice app with flashcards and quizzes. One of the easiest ways
to create a Quizlet list is to copy in vocabulary list directly in the tsv format,
so this approach makes that secondary use easy.
In our website’s repository, there is a special subdirectory for saving vocabulary list
.tsv files, with one for each chapter. In the Project directory, go to content ->
post -> vocab_list. This is where you want to save the .tsv file for your chapter.
To create the file, in RStudio go to the “File” tab in the menu at the top and select “New File” -> “Text File”. This will open a file in RStudio in plain text format. Save the file as “chapter_[x].tsv” (but replace “[x]” with your chapter number). Make sure you save it in the “vocab_list” subdirectory of the project with the rest of the vocabulary list files.
Now write your vocabulary terms and definitions in this .tsv. This file extension stands
for “tab-separated”, so to format the file correctly, you should:
- Put each term / definition pair on its own line. Because some terms will be long, they may visibly “wrap” in the text file you have open, but as long as you don’t press the “Return” key, they should still be on one line of the file. To doublecheck, you may want to make sure that you have line-numbering on in RStudio and make sure that only one line number is listed for each term on the left hand side of the file.
- Press the “Tab” key to add a tab between the term and definition on each line. This should be the only place you have tabs in the file. R will look for tabs to figure out where to split between vocabulary terms and there definitions (as will Quizlet when you copy the terms into the list there). Sometimes it won’t look like the tab’s added a lot of space, but that’s no problem—the computer can see it even if you can’t!
- Don’t put any header information at the start of the file. Just start directly with your first vocabulary term.
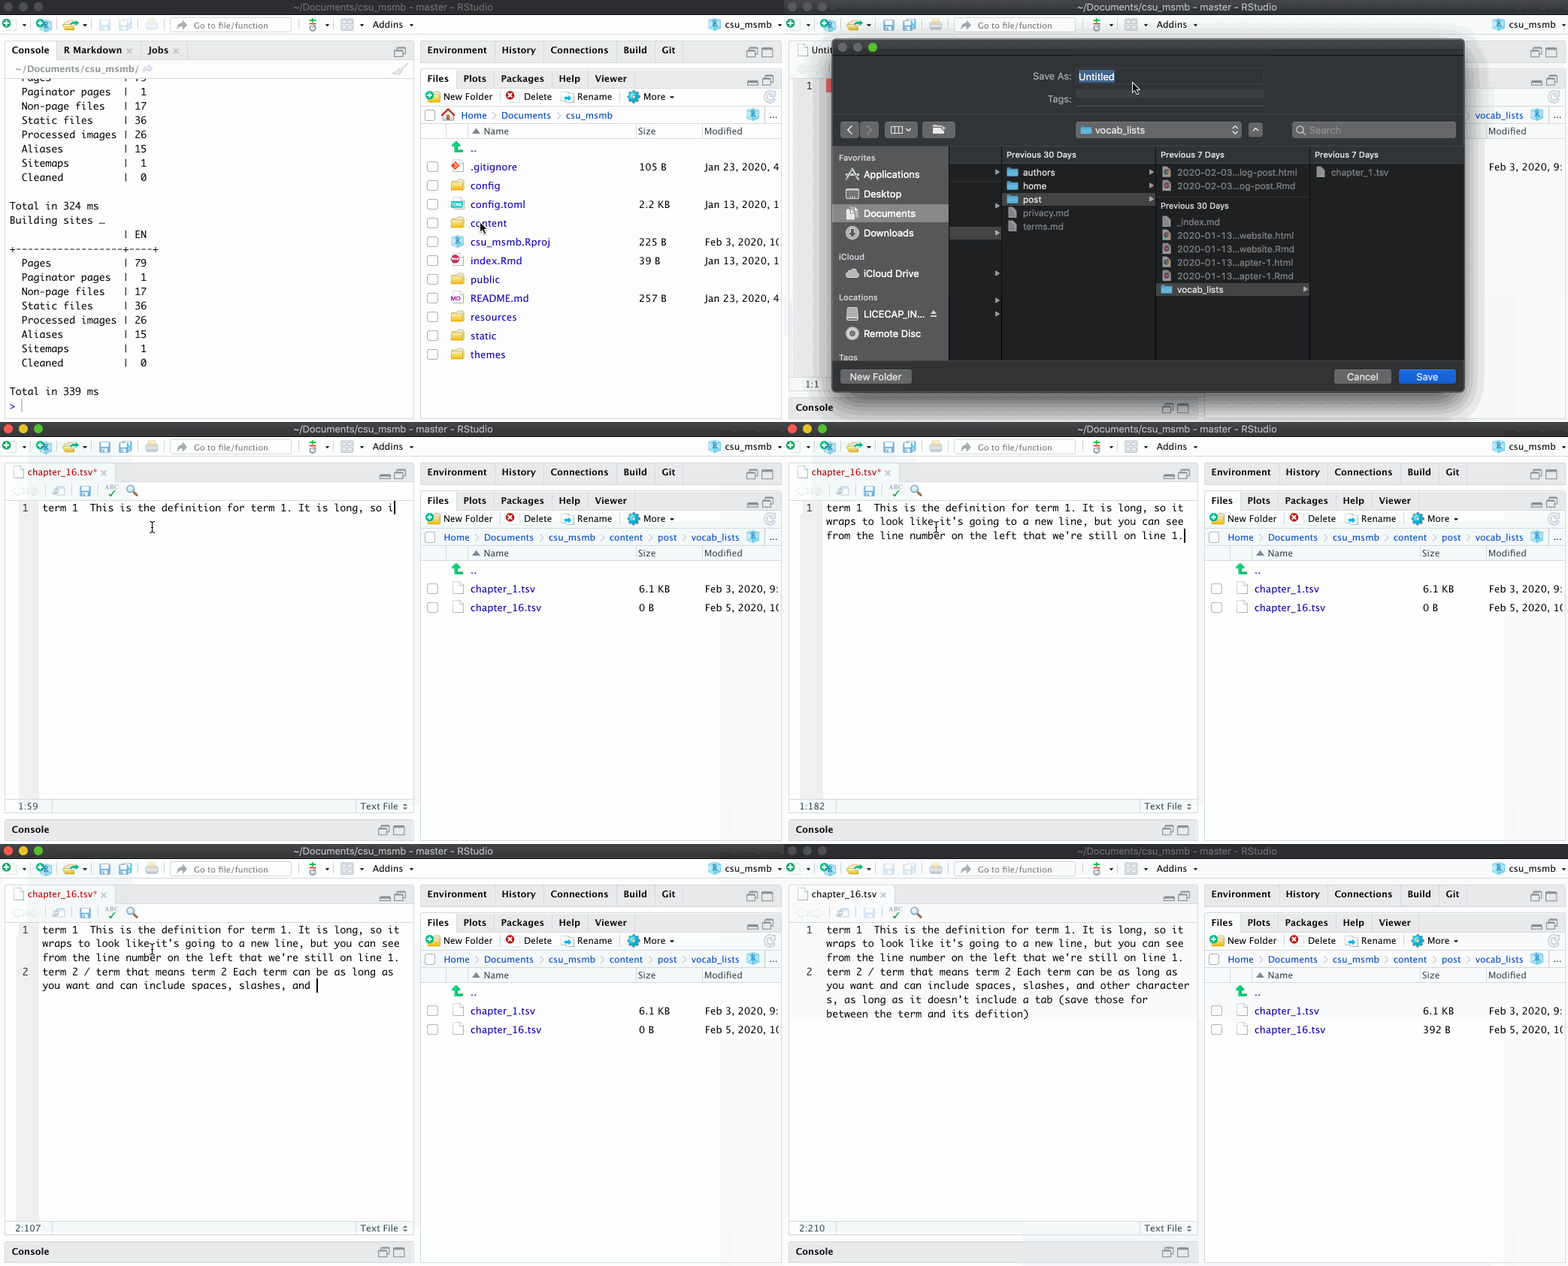
If you’d like to see an example, check out the “chapter_1.tsv” file in the “vocab_lists” subdirectory. This is the file that serves as input for the Chapter 1 vocabulary list blog post.
Here are some guidelines for writing your definitions:
- It is fine to use wording from the chapter text or to use wording directly from other websites or sources. However, you must include a list of any of the sources that you used to write your definitions at the bottom of the vocabulary blog post. Further, if you are using sources besides the course textbook, make sure that the definition is appropriate in the context of our course. Often, words will have a number of different definitions across different disciplines. Try to use more formal sources (e.g., textbooks, other published books) rather than less formal websites to find definitions whenever possible. See the Chapter 1 vocabulary list for an example of what we expect for using and listing references.
- If a vocabulary term was defined in a previous chapter’s vocabulary list, feel free to reuse the definition.
- Our library has excellent resources that you can use to help write your definitions, including textbooks and dictionaries specific to biology and statistics.
Adding R code to show the list in the post
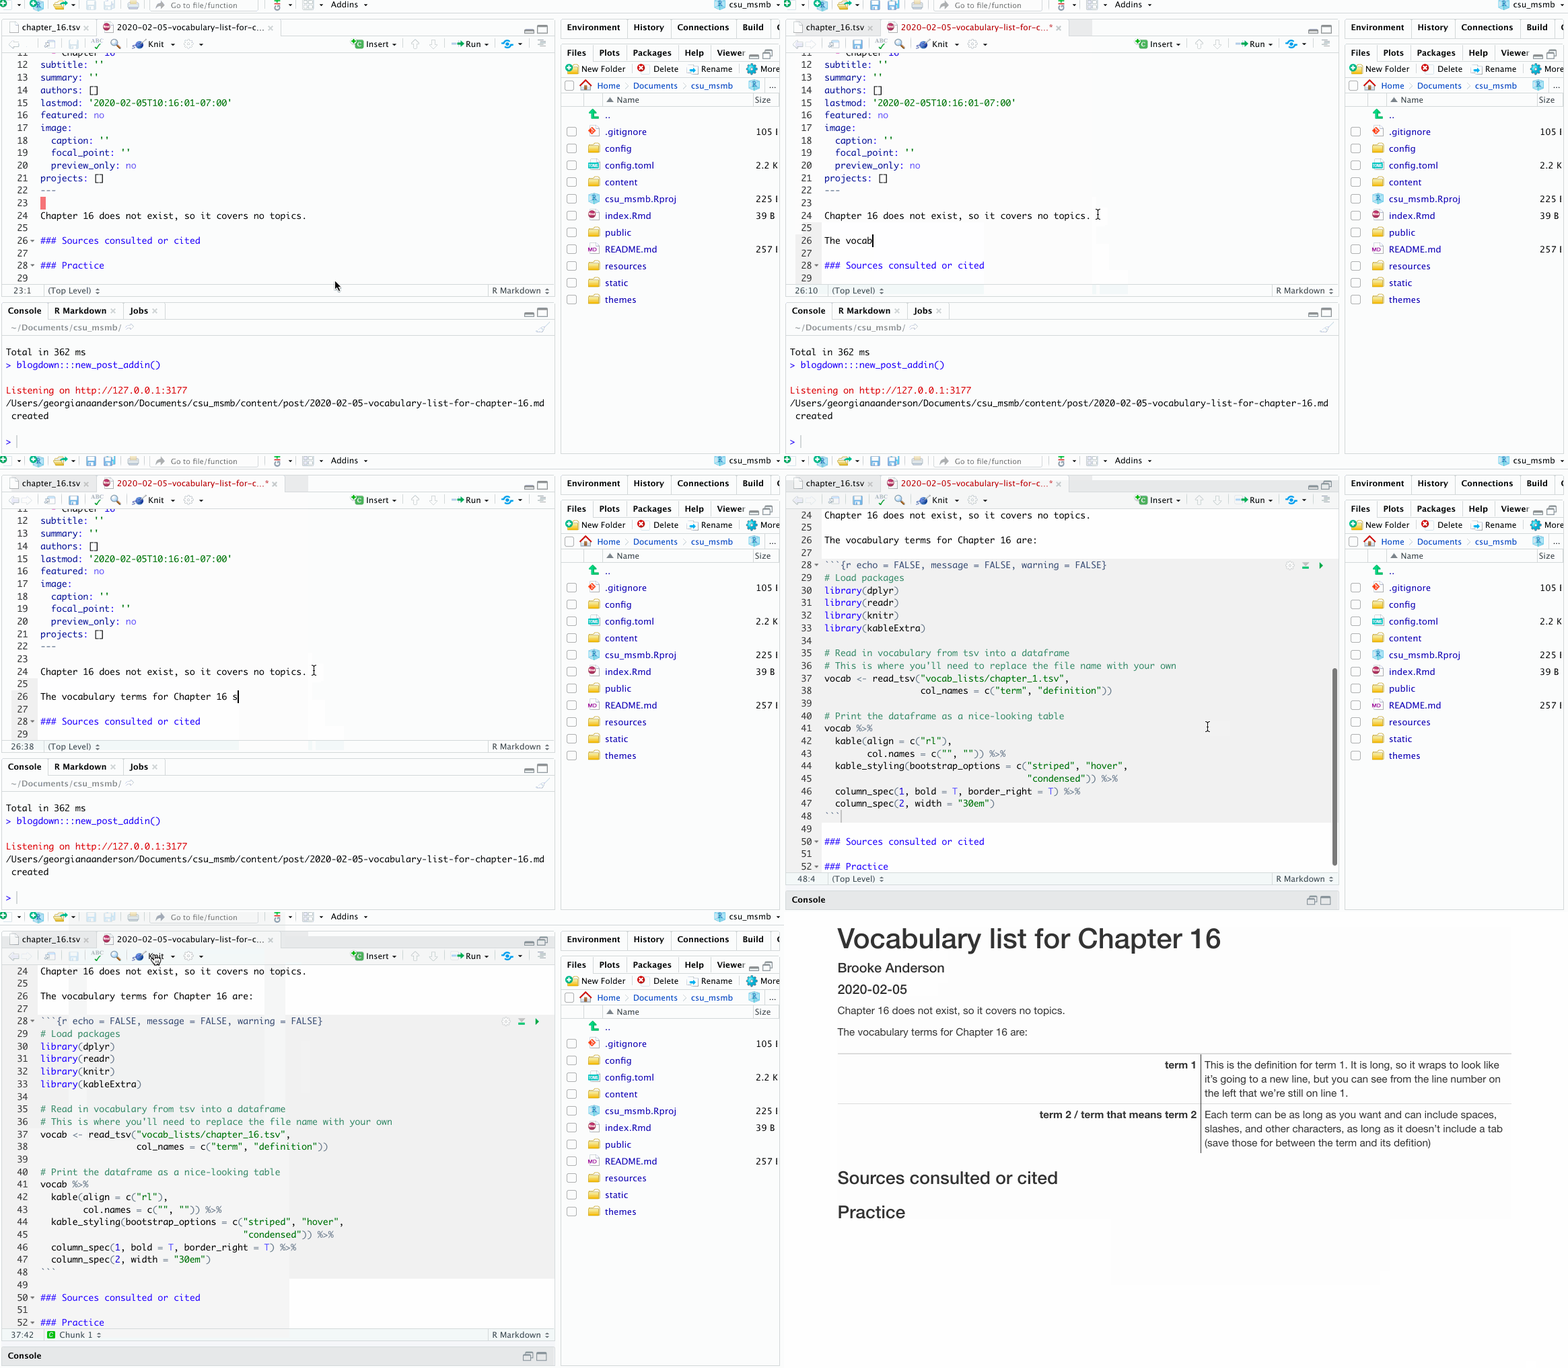
I’ve written up some R code that will read in the vocabulary list and make it into a nicely formatted table in the HTML version of the blog post. You can re-use this R code in your post, you’ll just need to change the name of the input file to the one for your chapter’s file.
This R code uses a few R packages beyond the base R code. If you haven’t installed these packages yet, you’ll need to before the code will run. You’ll need to install:
knitrdplyrreadrkableExtra
Once you have these, below your paragraph summarizing the chapter’s theme, write:
“The vocabulary words for Chapter [x] are:”
(but with your chapter’s number) and then paste in the following code and change
chapter_1.tsv in the code to the correct file name for the .tsv file you created
for your chapter’s vocabulary.
```{r echo = FALSE, message = FALSE, warning = FALSE}
# Load packages
library(dplyr)
library(readr)
library(knitr)
library(kableExtra)

# Read in vocabulary from tsv into a dataframe
# This is where you'll need to replace the file name with your own
vocab <- read_tsv("vocab_lists/chapter_1.tsv",
                  col_names = c("term", "definition"))

# Print the dataframe as a nice-looking table
vocab %>%
  kable(align = c("rl"),
        col.names = c("", "")) %>%
  kable_styling(bootstrap_options = c("striped", "hover",
                                      "condensed")) %>%
  column_spec(1, bold = T, border_right = T) %>%
  column_spec(2, width = "30em")
```
This code reads in the data from your .tsv file and then formats it in a nice way.
If you’d like to understand it better, try commenting out some lines and see how it
changes the output. One of my favorite piece of this code, one that I think might
come in useful for you later, is column_spec(2, width = "30em"). This sets the
width of one of the columns to be 30 ems (the width of the letter “m” in whatever
font you’re using). By setting the width, the table won’t automatically expand to
fit the text you put in the column onto one row. Instead, it will allow the text
to “wrap”, going onto separate lines if the definition entry is long enough.
If you want to find out more about creating really fancy tables from RMarkdown,
check out the documentation on the kableExtra package. What you can do (and how)
is different, depending on whether you’re outputting to a pdf or a HTML file, so there’s
separate documentation for each.
Once you add this code in, I’ve found that you actually do need to press the Knit
button sometimes. If you don’t see your list when you save your file, or if it doesn’t
update properly as you make changes to your file, try knitting with the Knit button
and that should help.
Creating and embedding a Quizlet app
The last piece of the blog post is the practice section. For this, you’ll create a vocabulary list on Quizlet, which you can then embed in the blog post, so the other students can practice right on our site.
You’ll need to sign up for a Quizlet account first. The free account is fine.
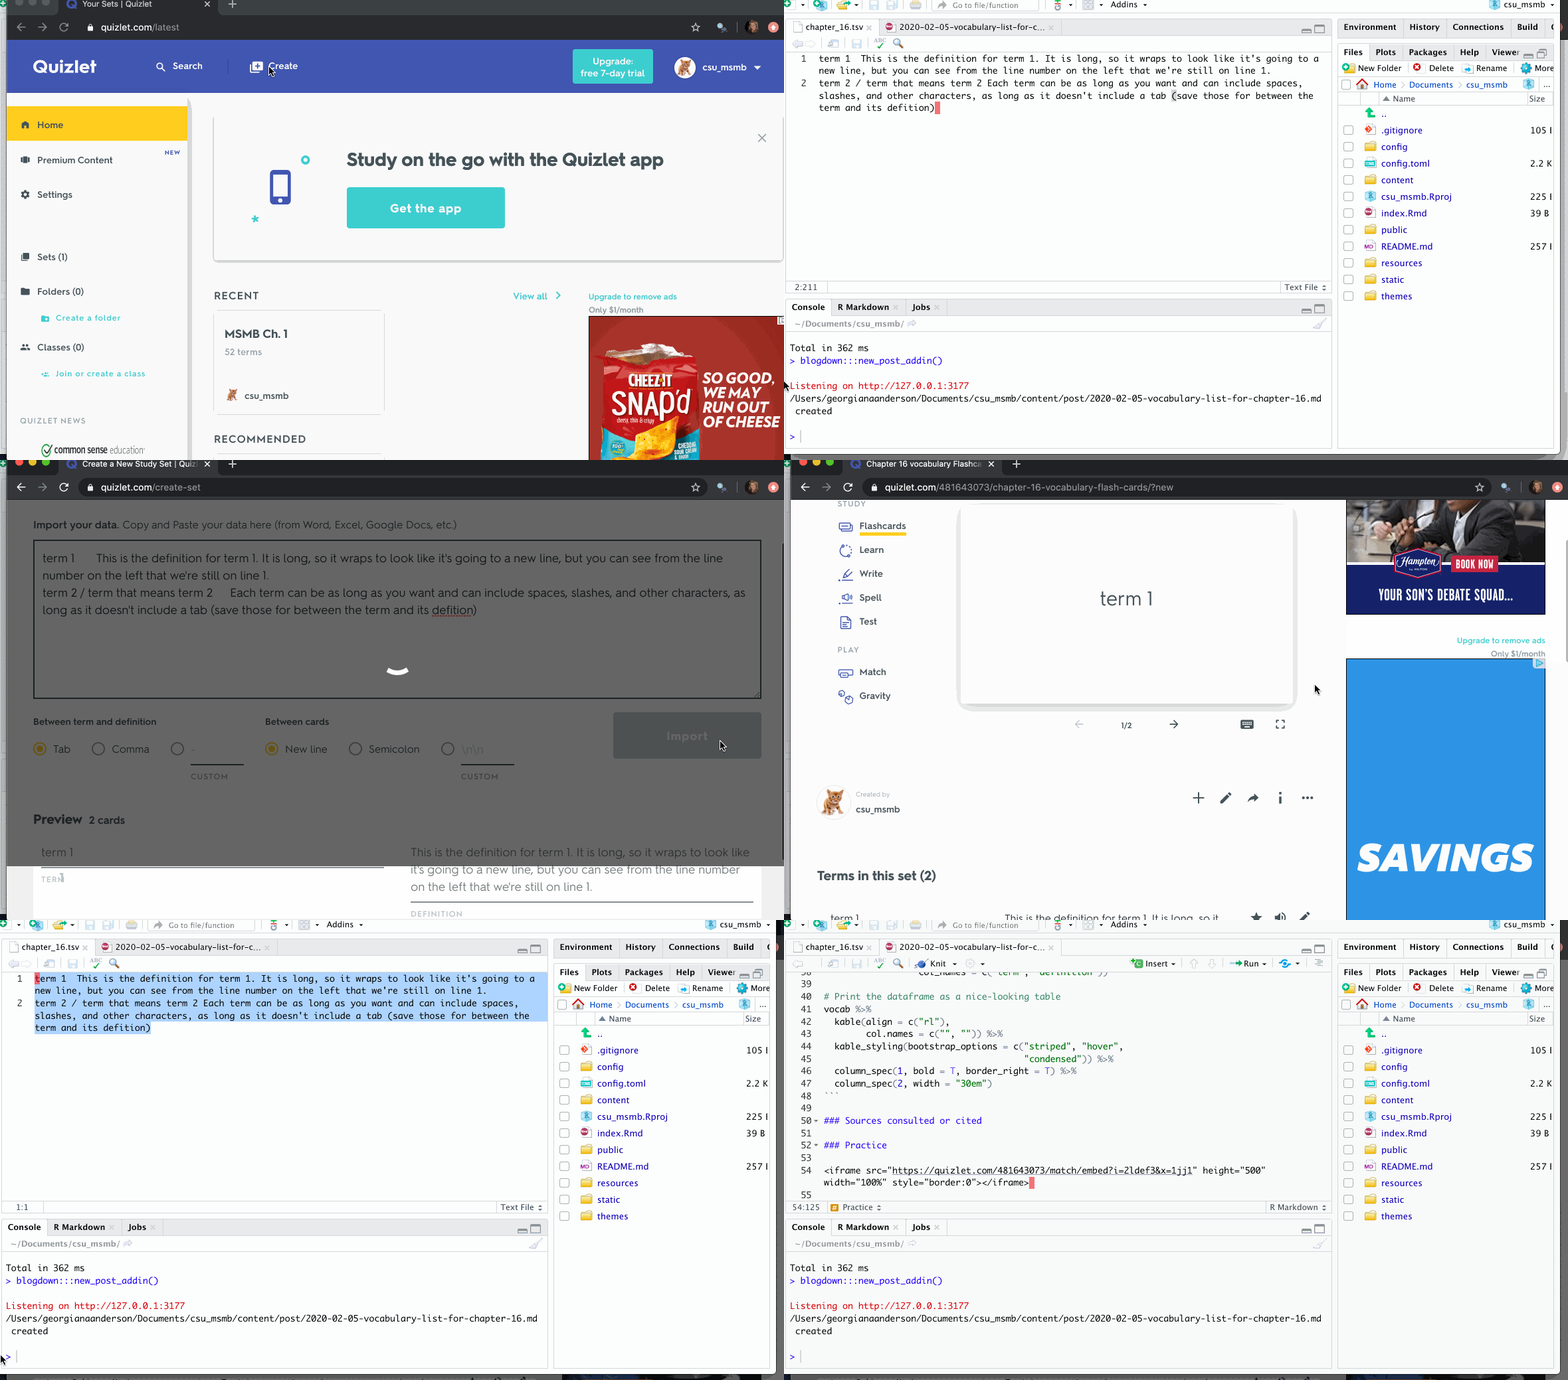
Next, create a new vocabulary list. There’s a “Create” button for making new lists
on the main page. While you can add vocabulary by hand, you can also post in a
whole list if it’s in a tab-separated or comma-separated format. Copy in the contents
of your vocabulary list .tsv file. You can preview the terms lower on the page
once you do, to make sure that all the terms and definitions came in correctly.
If everything looks good, click on the buttons for “Import” and then “Create”.
This will create your list and take you to a page where you can try out your flashcards. On this page, there’s also a button with three dots. If you click on this, there’s a choice of “Embed”. When you embed HTML content, you are inserting an application from one website within another one. Embedding is a really fun trick for enriching blog posts and other RMarkdown documents that are rendered to HTML. For example, you can also embed Shiny apps, YouTube videos, and Google maps in your RMarkdown using the same process we’ll use here.
When you select “Embed”, a pop-up window will open with some HTML code. Copy this and then paste it in the “Practice” section of your vocabulary blog post. Be sure to leave a blank line above and below the text you paste. When you look at your blog post in a web browser now, you should see the practice flashcards embedded in the “Practice” section.
Submit the post
So far, you’ve made these changes to your local copy of our website’s repository. To submit the changes to us, you’ll need to push your changes to your remote version of the repository (the one in your GitHub account) and then submit a pull request to us for us to pull those changes into the original website repository (the one in my GitHub account). This process should feel pretty familiar—it’s pretty much what you did to submit your changes to your profile information for the website on the first day of class.
As with other steps, there are several ways you can do this, and if you have an idea of how to get it done, any way is fine. If you don’t know where to start, though, you can follow along in this section for one way to do it.
Pushing your changes to your remote repo
First, you’ll need to get any changes you’ve made from your local repository up to your remote version on GitHub.
First, commit any changes that you’ve made through the Git window in your
RStudio session. This will record the changes you’ve made in the git record
for your local repository.
Next, you’ll need to push these commits to the remote repository, to send
these changes to GitHub. In the Git window in RStudio, there’s a green up
button. Push that. It should send all your changes up to your GitHub version of
the repository. To check, go online to your GitHub account and look through
your repositories for your fork of “csu_msmb”. Click on “Commits” to see a
history of the commits to the repository—your latest ones should be at the top
of the list.
Submitting a pull request to the original repo
At this point, you’ve made changes, checked them, and pushed them to your GitHub version of the repository. Remember, though, that you forked the repository from our original one, and so you’ve been working with a copy of the repository this whole time, rather than changing our original version.
To get your changes incorporated into our original version, you’ll need to request that we pull your changes into the original repository. To do this, you can submit a pull request through GitHub. Go to the main page for your fork of the GitHub repository and look for a button that says “New pull request”. When you click this, it will walk you through making a pull request. You’ll have a space to write a message describing the changes you’re recommending in the pull request.
If you’d like more details on this information, GitHub has help documentation on pull requests.
Edit and re-submit the post based on faculty feedback
The other faculty members and I will get a notice when you submit your pull request. We’ll take a look and will probably have some suggestions for the wording of some of the vocabulary terms. We’ll give you some feedback through the pull request page, and then we’ll work together to get the list finalized before it’s published for the rest of the class.