How to add your profile details to our course website
One goal of this course is to continue developing your data science programming skills. This will include plenty of work on R programming, but also more to help you learn tools for reproducible research, like RMarkdown and git.
We will be using our course website as a collaboration tool during this course. This website was created using blogdown, which allows you to create and update a blogging website with R and RStudio. We are using a GitHub repository to share all the code for this website and serving the site using Netlify.
During this course, you will have two graded products that you will need to submit as blog posts to our site. One will be a glossary of vocabulary terms for one chapter of the book, listing key words and their definitions for the chapter. The second will be the “official” version of one week’s in-course exercise.
To help get you up to speed with using blogdown, GitHub, and RMarkdown with our site, we’ll start by having you update your profile details for our website. We’ll also use this to give you all a chance to introduce yourselves to each other and to us. This post covers the details for how to do that.
Required set-up
This exercise, and this course as a whole, requires a certain set-up on your computer:
- R installed on your laptop
- RStudio installed on your laptop
- git installed on your laptop
- Your own GitHub account
If you already have all this set-up, you can skip to the next section. Otherwise, this section has details on completing this set up.
Install R on your laptop
You can install R from the Comprehensive R Archive Network (CRAN). Search for the version appropriate for your computer’s operating system.
If you already have R installed, check your version number. If it’s older than
six months or so, you should probably update your version for the class. You can
use the sessionInfo() function to find out details about your current R
session, including the version of R you’re currently running:
sessionInfo()## R version 3.6.3 (2020-02-29)
## Platform: x86_64-apple-darwin15.6.0 (64-bit)
## Running under: macOS Mojave 10.14.6
##
## Matrix products: default
## BLAS: /Library/Frameworks/R.framework/Versions/3.6/Resources/lib/libRblas.0.dylib
## LAPACK: /Library/Frameworks/R.framework/Versions/3.6/Resources/lib/libRlapack.dylib
##
## locale:
## [1] en_US.UTF-8/en_US.UTF-8/en_US.UTF-8/C/en_US.UTF-8/en_US.UTF-8
##
## attached base packages:
## [1] stats graphics grDevices utils datasets methods base
##
## loaded via a namespace (and not attached):
## [1] compiler_3.6.3 magrittr_1.5 bookdown_0.18 tools_3.6.3
## [5] htmltools_0.4.0 yaml_2.2.1 Rcpp_1.0.4.6 stringi_1.4.6
## [9] rmarkdown_2.1 blogdown_0.18 knitr_1.28 stringr_1.4.0
## [13] digest_0.6.25 xfun_0.13 rlang_0.4.6 evaluate_0.14Based on the return from this call, for example, I can tell that I have R version 3.6.3 (2020-02-29).
Install RStudio on your laptop
You can download RStudio directly from their website. The free Desktop version will work great for this course. If your version of RStudio is more than a year old, you should probably update it for this course. To check your version of R Studio, open R Studio, go to the “RStudio” tab at the top, and click on “About RStudio”.
Install git on your laptop
The software git is version control software, which will help you record and track changes that you’ve made to code and other plain text documents.
It’s free to download. Go to https://git-scm.com/downloads and select the version for your operating system. For this software, you’re probably okay if you downloaded it a little while ago (although if more than two years or so, you might want to update).
Get a GitHub account
You will need a (free) GitHub account for this course. You can sign up for one (if you don’t already have one) at https://github.com/. While there are some fancier paid plans available, the free account will work great for this class.
When you sign up, you’ll get to choose a GitHub handle. You might want to make this something that will be easy for people to remember. For example, if your name is still available, that would be a great option. This handle will form part of the address to all of your GitHub repositories, so it is convenient if it is easy for people you work with to remember (mine, unfortunately, is not!).
About blogdown
The blogdown package is an R package created by Yihui Xie that allows you
to use R and RStudio to create and update your own webpage with a blog. The
appeal of being able to do this with R is that you can write blog posts
using RMarkdown, so you can include executable R code in each post.
blogdown creates your site using the Hugo framework.
Hugo is software that can build static websites (i.e., ones that can be
served to viewers without needing database backends or other fancy things).
People have created different templates for Hugo-generated websites, and these
templates provide the structure and framework, while you can adapt the content.
This means that our website (which is, essentially, a collection of files in a directory written in a form that a web browser can convert to a pretty website) includes a lot of files and code that come straight from a template that someone else wrote, and then places here and there where we can add or change the files to make the website ours.
One of the ways that you can change the website is to add posts. You’ll be doing this later in the course by contributing two blog posts of your own, one on the vocabulary for a chapter and one with the “official” version of the exercise for a chapter. We’ll cover more on how to add a blog post later in the course.
The other way that you can change the website is to change some of its “front page” data. The website has a section on “People”, with the profiles of everyone in the class. The information shown in this section is all saved in plain text files in our website’s file directory. Today, you’ll change you details in the file dedicated to you and then send those changes back to us so we can update the online version of the site.
You will need to install two pieces of software to work on our
website. First, you’ll need the R package blogdown. You can install
this package in the normal way, using install.packages:
install.packages("blogdown")Once you have blogdown, you can install the Hugo software using a function
in the blogdown package, install_hugo:
library(blogdown)
install_hugo()
For both these installations, your computer will need to be online or you’ll get an error.
Getting a fork of our repository on your computer
All our websites files are posted in a GitHub repository at https://github.com/geanders/csu_msmb. With this (or any) GitHub repository, you can suggest changes by forking the repository, cloning the fork to your computer, making and committing the changes, pushing those commits back up to your fork of the repository on GitHub, and then submitting a pull request.
Forking a GitHub repository
When you fork a GitHub repository, you get a copy of that repository that you can play around with and change yourself, without it affecting the original repository. It’s essentially just copying the whole repository, with all its files, into a repository on your GitHub account.
The only thing that makes it different from a plain copy (and what makes it really powerful in some cases) is that, if you decide that your changes might make the original repository better, you can submit a pull request. This requests that the owners of the original repository update it to incorporate the changes you’ve made on your fork of the repository. The original authors can review each of the commits you’ve made, so they can even cherry-pick your changes if they want.
GitHub also lets the original authors see if there are any merge conflicts created from changes that they’ve made to the original repository since you forked it. This can let the original authors see how hard it will be to incorporate all of your changes in the forked version with their version of the repository.
To fork the repository with our course’s website materials, all you’ll need to do is go to our GitHub repository for the course website (while you’re signed in to GitHub) and click on the “Fork” button towards the right of the page. Now go and check in the “Repositories” section of your own GitHub account—you should see that you now have a forked copy of the “csu_msmb” repository.
In this exercise, you’ll work with the fork of the repository, and then once you’ve made your changes, you submit a pull request, so that we can get your changes back into the main webpage.
If you need more help on how to fork a repository, GitHub has a help page on the topic that might be useful.
Cloning the fork to your computer
Next, you’ll want to get a copy of your forked repository onto your own computer, where you can work with it, make changes, and preview the website with your updates.
To do this, you’ll clone your fork of the repository onto your computer. The version of the repository on GitHub is called the remote branch of the repository and the version you get on your computer once you’ve cloned it is the local branch. By cloning (instead of just downloading), you’ll maintain a connection between the remote and local versions through git, which will allow you to push changes that you make and commit on your own computer up to the remote branch on GitHub.
Go to GitHub, make sure you are logged into your account, and navigate to your forked version of the repository for this class. There should be a button to the right of the page that says “Clone or download” (you may need to scroll down to find it).
When you click on this button, it will give you a choice between “SSH” and “HTTPS” for the protocol to use to connect your local and remote branches of the repository. You’re welcome to try either, but I usually (on a Mac) have better luck with “SSH”. Occasionally, people running Windows in my courses have had better luck with “HTTPS”, although for most folks “SSH” seems to work fine. Once you choose which protocol to use, you can copy the snippet of code that is given in the pop-up.
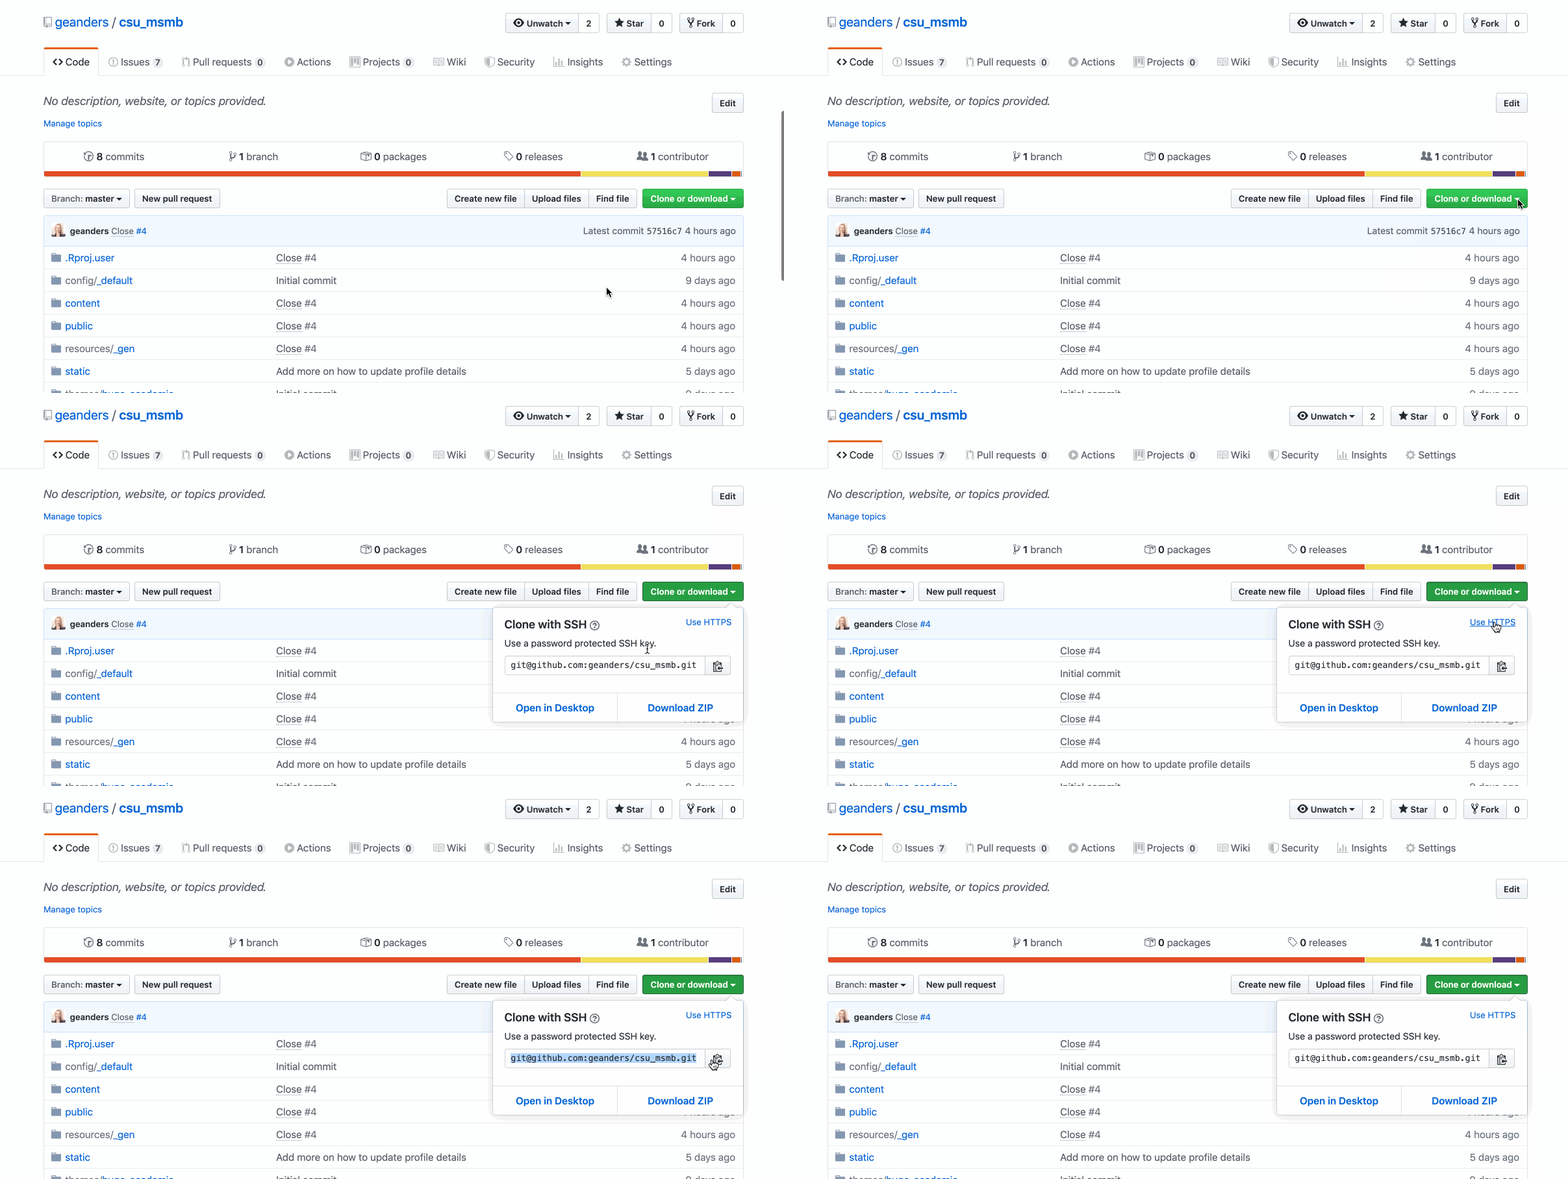
Next, you’ll run this code from a bash shell on your own computer to clone the repository. You first will need to open a shell. If you’re on a Mac, you can do that with the “Terminal” application. With Windows, you’ll probably need to use the bash shell that comes with the Windows version of git. Search your programs for “bash” or “git bash” and see if you see something that looks promising.
Once you open a shell, you’ll see a command prompt, like this:
username$You can type shell commands here and then press “Return” to run them. You
should first move into the directory where you want to clone the repository.
Your “Desktop” might be a good place for it for now (unless you have some
organization you use for course-related files). The cd shell command lets you
“change directory”. If you don’t put anything after cd, it will change to
your home directory. Otherwise, it will move to the directory you specify.
For example, if the “Desktop” directory is a subdirectory of my home directory,
I could move into it by running:
cd DesktopIf you have not use shell commands much before and are having any problems navigating to the directory you’d like, let us know in class, and one of us can help you.
Once you are in this directory, you’ll paste git clone followed by the command
you copied from the “Clone or download” button on GitHub. It will probably look
something like this (but with your GitHub handle in place of “geanders”):
git clone git@github.com:geanders/csu_msmb.git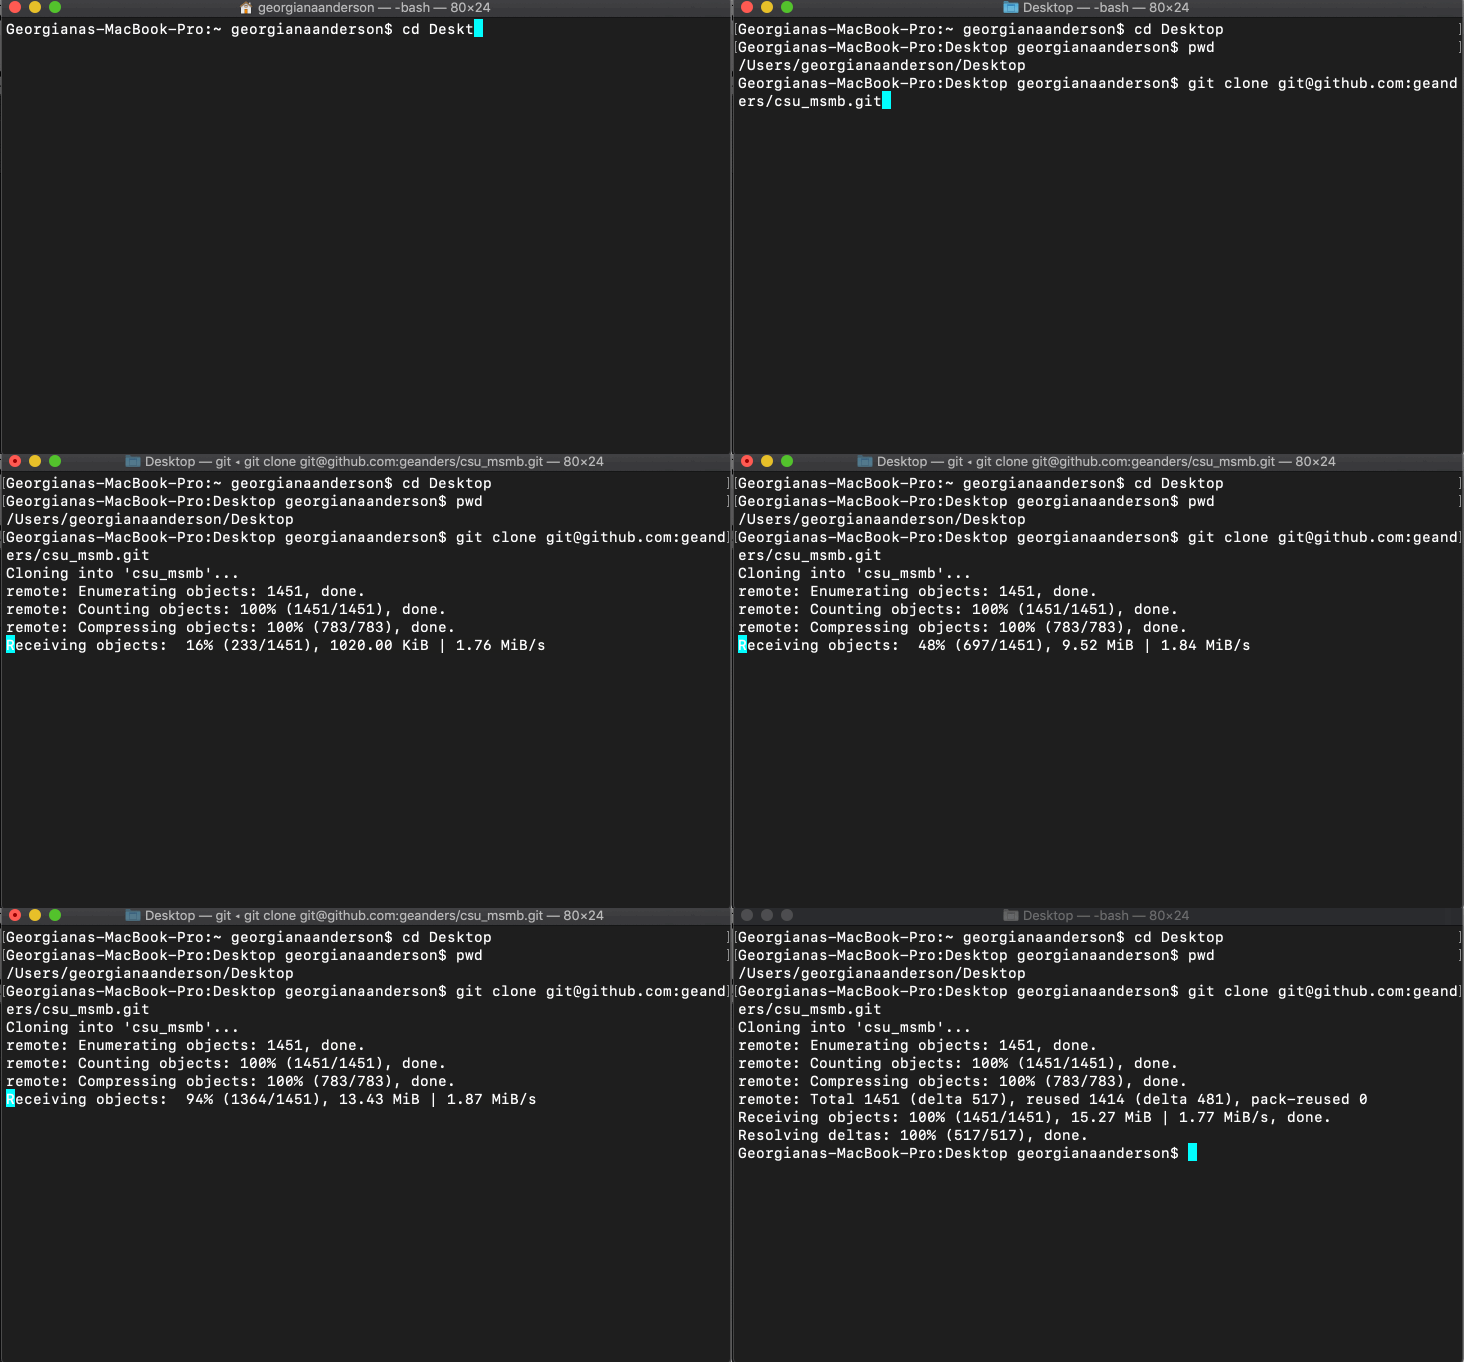
When you run this, you may have to put in your GitHub username and password. You may also get some questions about whether you really want to download the repository (you do). If everything’s successful, you should see that there’s a new directory called “csu_msmb” in which directory you decided to put it (“Desktop”, for example).
This directory has a special file in it that makes it an R Project—a special
version of a file directory with some extra structure and saved preferences. Make
sure that you open the project as a whole when you work on it in R Studio, rather than
opening just by clicking on one of the files. To do this, you can go in R Studio
to "File" -> "Open Project..." and then navigate through your file directory
to the “csu_msmb” directory you just cloned.
If you need more help, GitHub has a help page with more on how to clone a repository from GitHub to your own computer.
Changing and committing in RStudio
When you have R Studio open to an R Project that is using git version control, R Studio will include a “Git” pane. You can use this pane to commit changes you make to files in the repository, write messages explaining those commits, and push your changes to your remote branch of the repository on GitHub.
When you commit a change, that change is written into a log of every change made to the files in the repository. You can later look through these commits, so you’ll want the commit messages to make sense when you read them in the future. When you’re collaborating with others, the commit messages will help you see what each other are doing.
When you first commit a change, the commit is only saved in your local branch. To send it up to the remote branch of the repository on GitHub, you’ll need to push those commits. Once you push your local commits, your GitHub repository should exactly mirror your local repository.
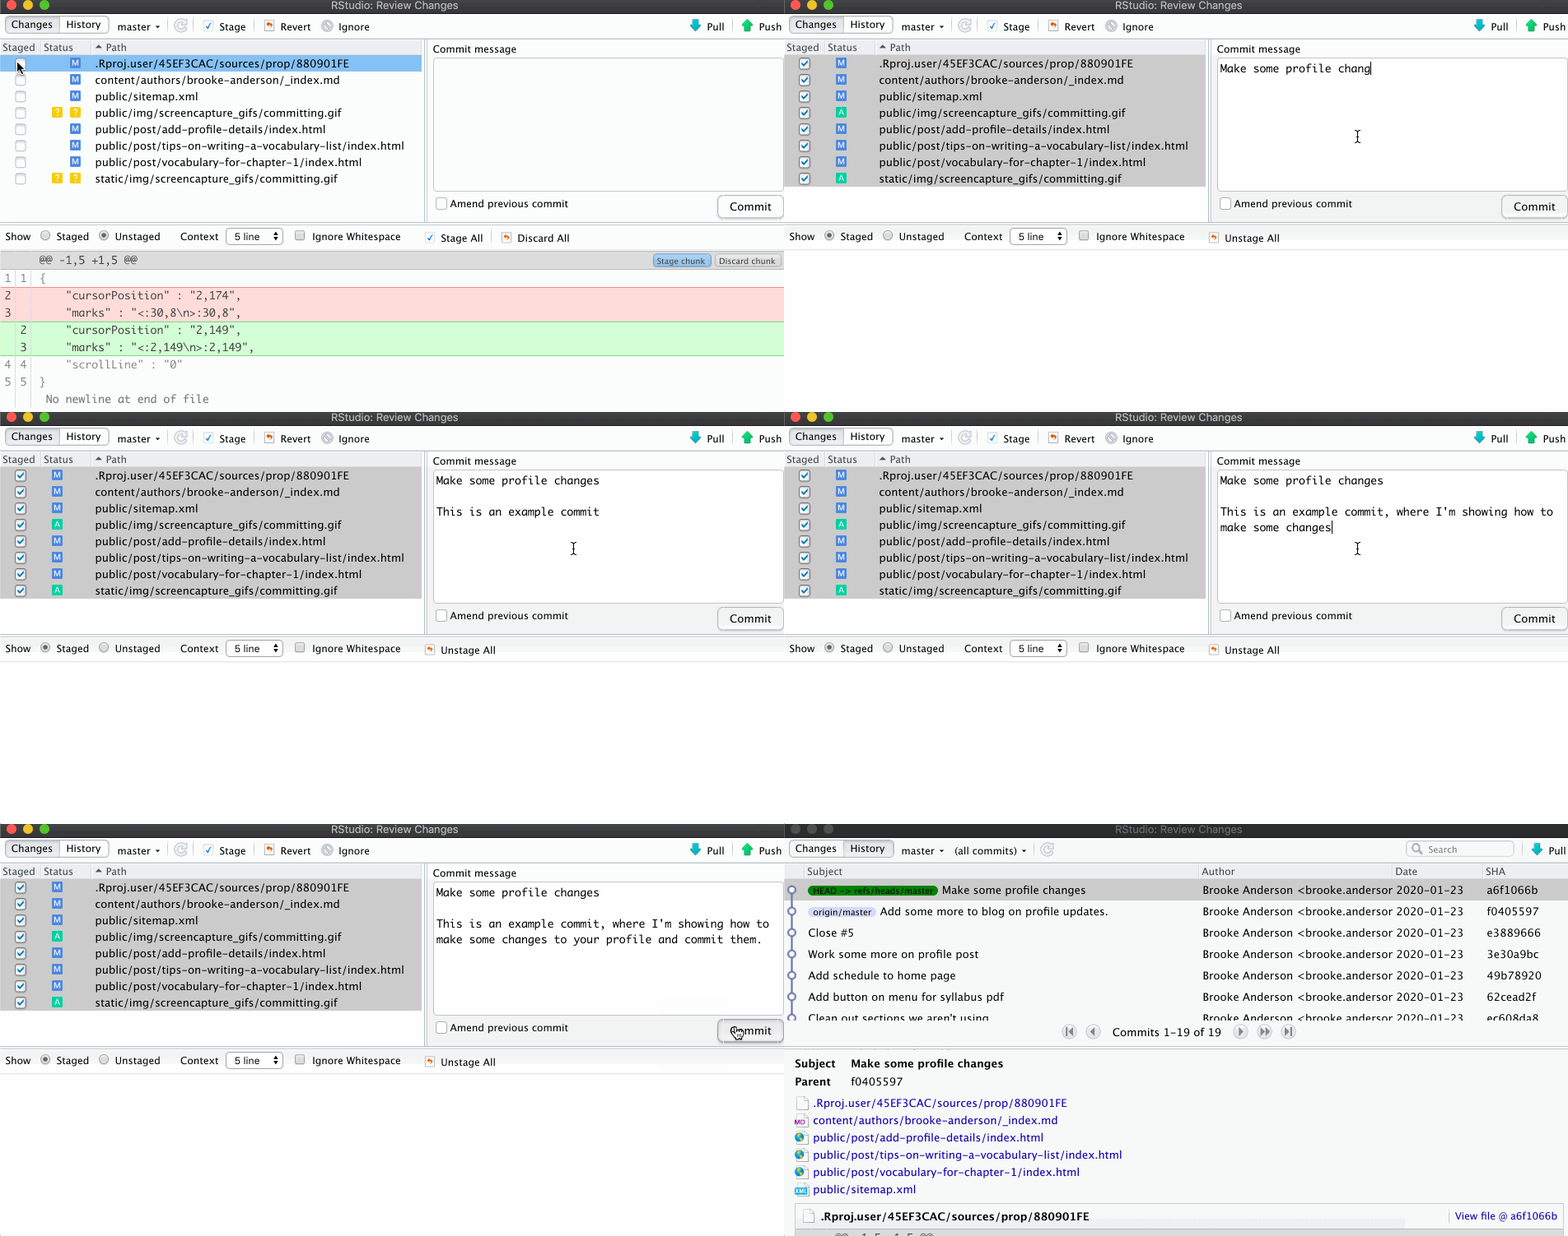
As soon as you make a change to a file in the repository that’s being track by git, that file will show up in the Git pane, with a little check box beside it. When you’re ready to commit a change, click on the “Commit” button on the top left of the Git pane. This will open a pop-up box.
In this box, click the check boxes for all the changed files on the left you’d like to include in the commit. Then write a short commit message, describing the changes you’ve made. You should try to fit it all in the first line of the “commit message” window. If you can’t, write a short description in the first line, skip a line, and then you can write as much as you want.
Once you’ve written your commit message, click on the “commit” button. This will record this commit. To check that it has, you can go to the “History” tab and make sure the commit shows up as the last thing in your history.
Updating your profile details
Rendering blogdown websites in RStudio
Once you’ve opened the R Project with our website, you can use the
blogdown package to serve the website. This will only update and
show the website on your computer (not change our main website online),
but it lets you check that everything’s working and preview what the
site will look like online.
RStudio’s “Viewer” pane can work as a web browser. This means that it can show our website. When you have opened the R Project with the cloned repository of our website (“csu_msmb”), try running the following in your R console to render the site:
library(blogdown)
serve_site()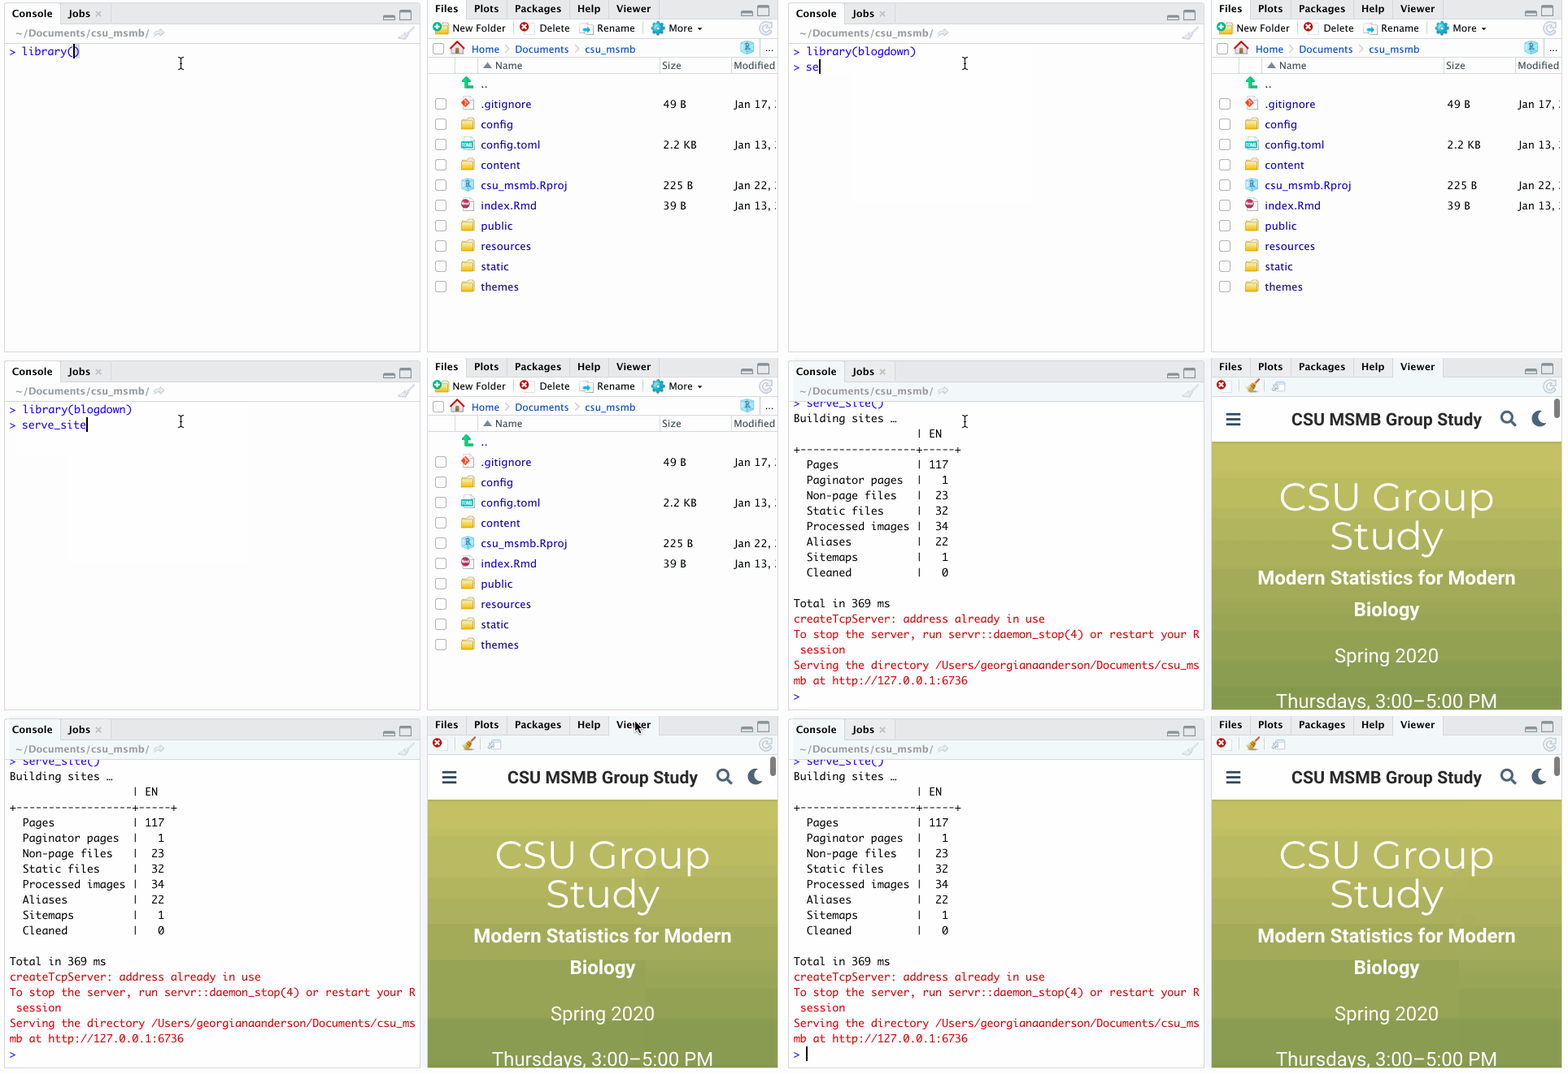
If everything worked, you should be able to see a version of the website in your RStudio “Viewer” pane. If you’d like to see it in your usual web browser, click on the “Show in new window” button on the top left of the “Viewer” pane (this looks like a little rectangle with an arrow on it). This will open the website in your default web browser.
Take a look at the web address when you do—it should start with 127.0.0.1.
This is a loopback address—an IP address that refers back to your local
computer (localhost), rather than an outside web servers. Anytime you’re
building a website and checking it locally, you’ll see this in the web address
when you open the site in a web browser. (You can even get T shirts with “There’s no place like
127.0.0.1”).
As you work through the next parts of the exercise, the rendered website in the
Viewer pane should update every time you save your changes to files in the
website. If you have the website open in your default browser, too, you might
want to refresh the site with the normal “Refresh” button for your browser.
If things ever seem like they’ve gotten out of sink, you can always re-run
serve_site().
Updating your information in "_index.md"
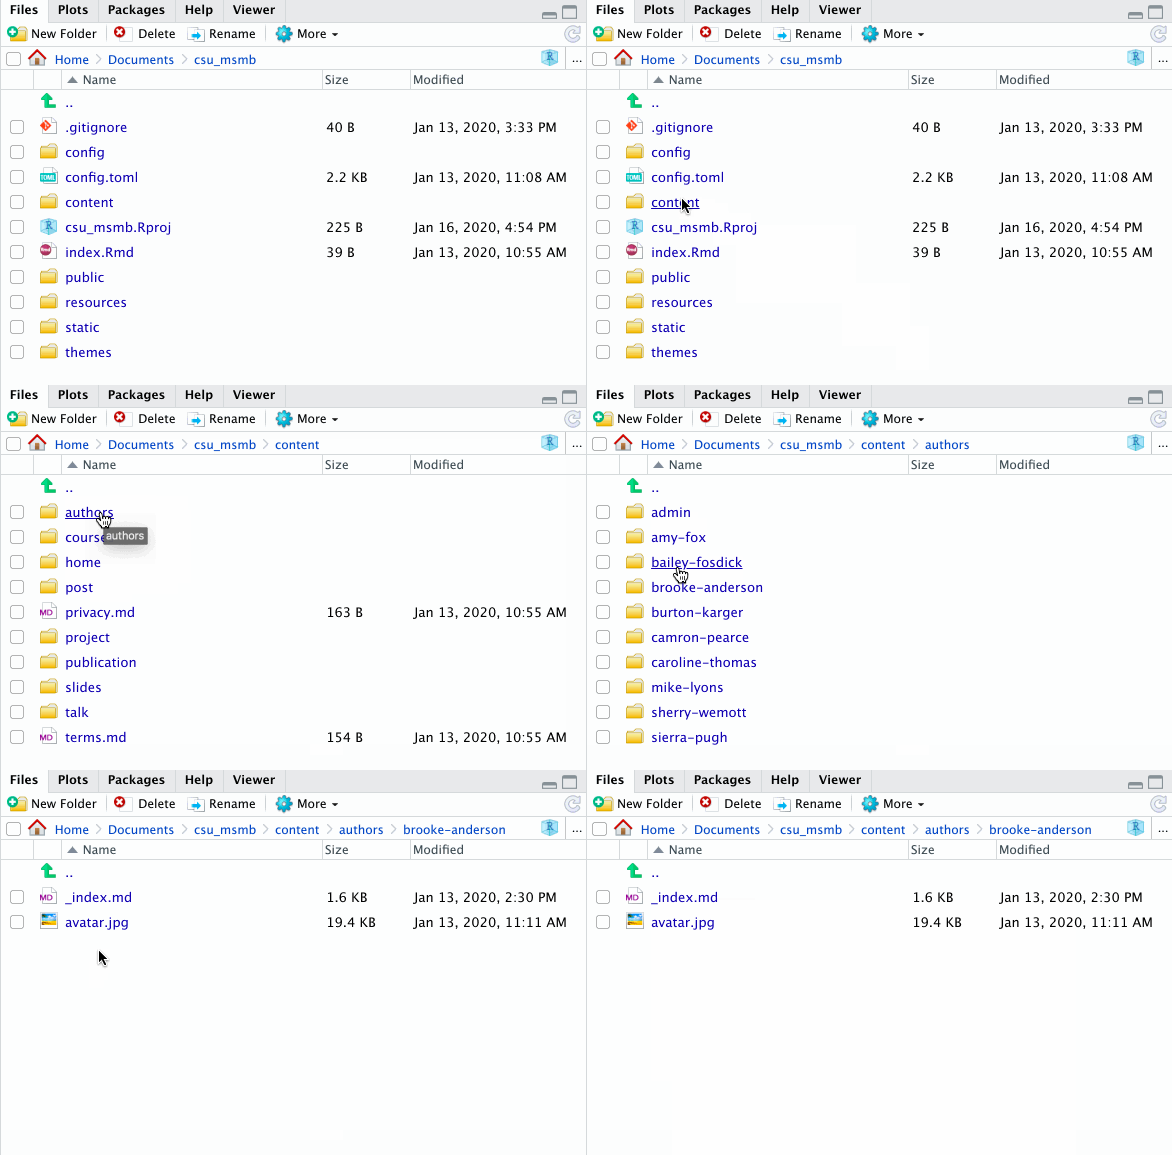
Your details are all given in the "_index.md" file in your author subdirectory. To update your details on the website, you’ll need to change your details in this file.
The file is written in a Markup language called YAML. If you’ve used RMarkdown before, you might recognize this syntax from the information that goes at the very top of each RMarkdown file.
In your "_index.md" file, anywhere there is a placeholder, like “[Year]” or “[Institution]”, replace the placeholder with your own information.
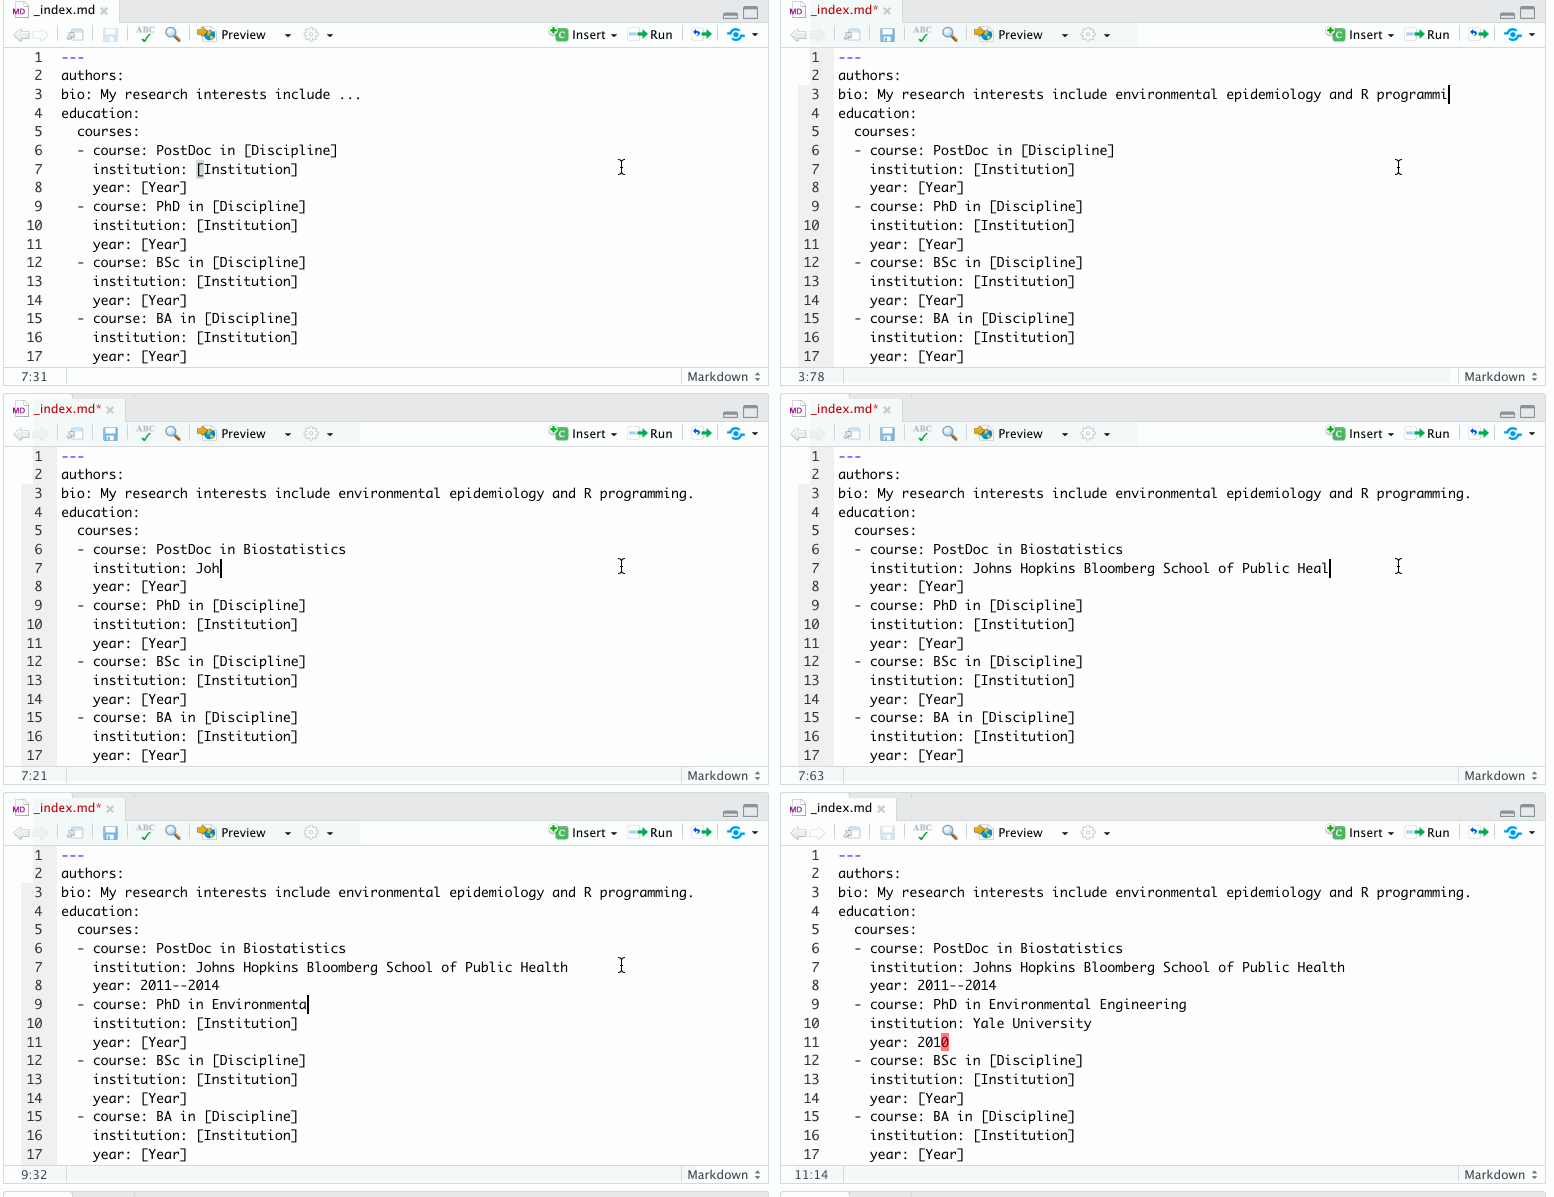
Be very careful when changing things like spaces and hyphens in the structure, as YAML is based on parsing these elements. As with any Markup language, as you are learning it, it’s best to try to render the final document often as you make changes, so you can make sure the changes make it through like you want and so you can catch any problems quickly.
Make sure you change the following sections:
bio:education:email:interests:name:organizations:
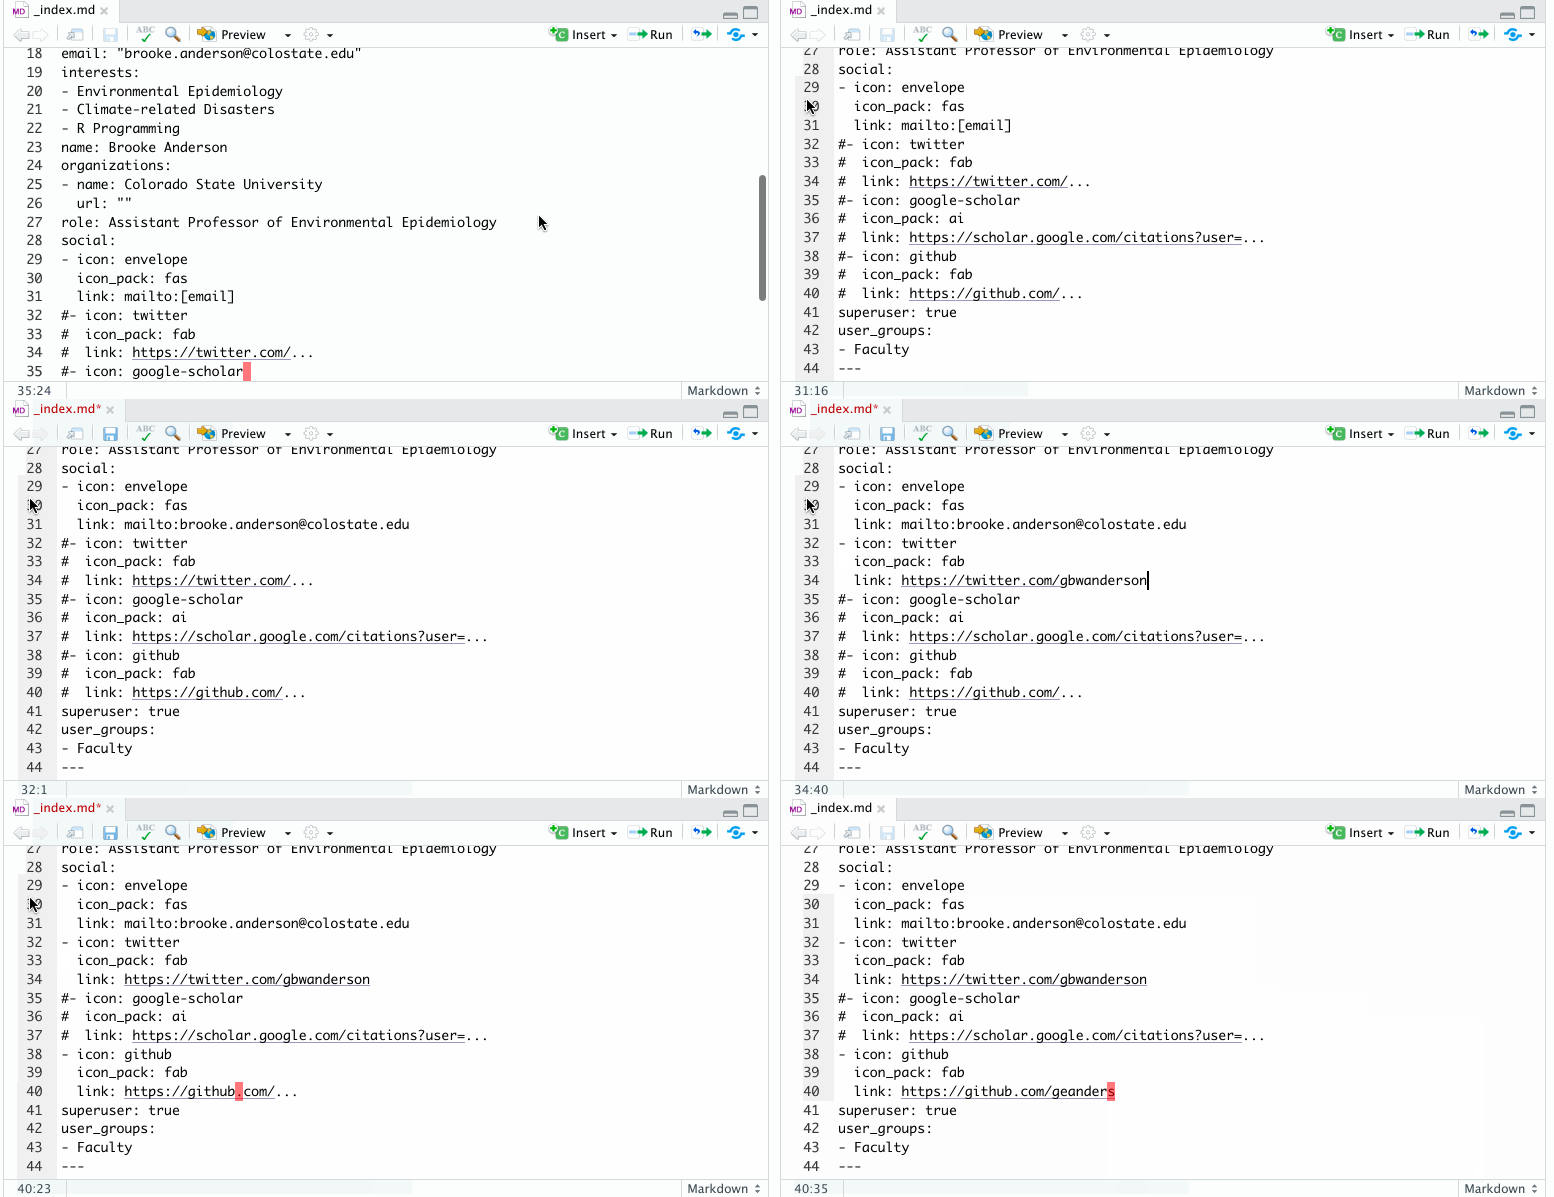
Some of the sections in social: are commented out, including the information
for buttons for GitHub, GoogleScholar, and Twitter. If you have accounts through
any of these services, you can add these buttons with your updated information.
Just delete the # at the beginning of all lines in that section and then
change the handle or web address information so that it links to your
account for that service. In this section, also update your email address, with
mailto: at the beginning, for the email icon.
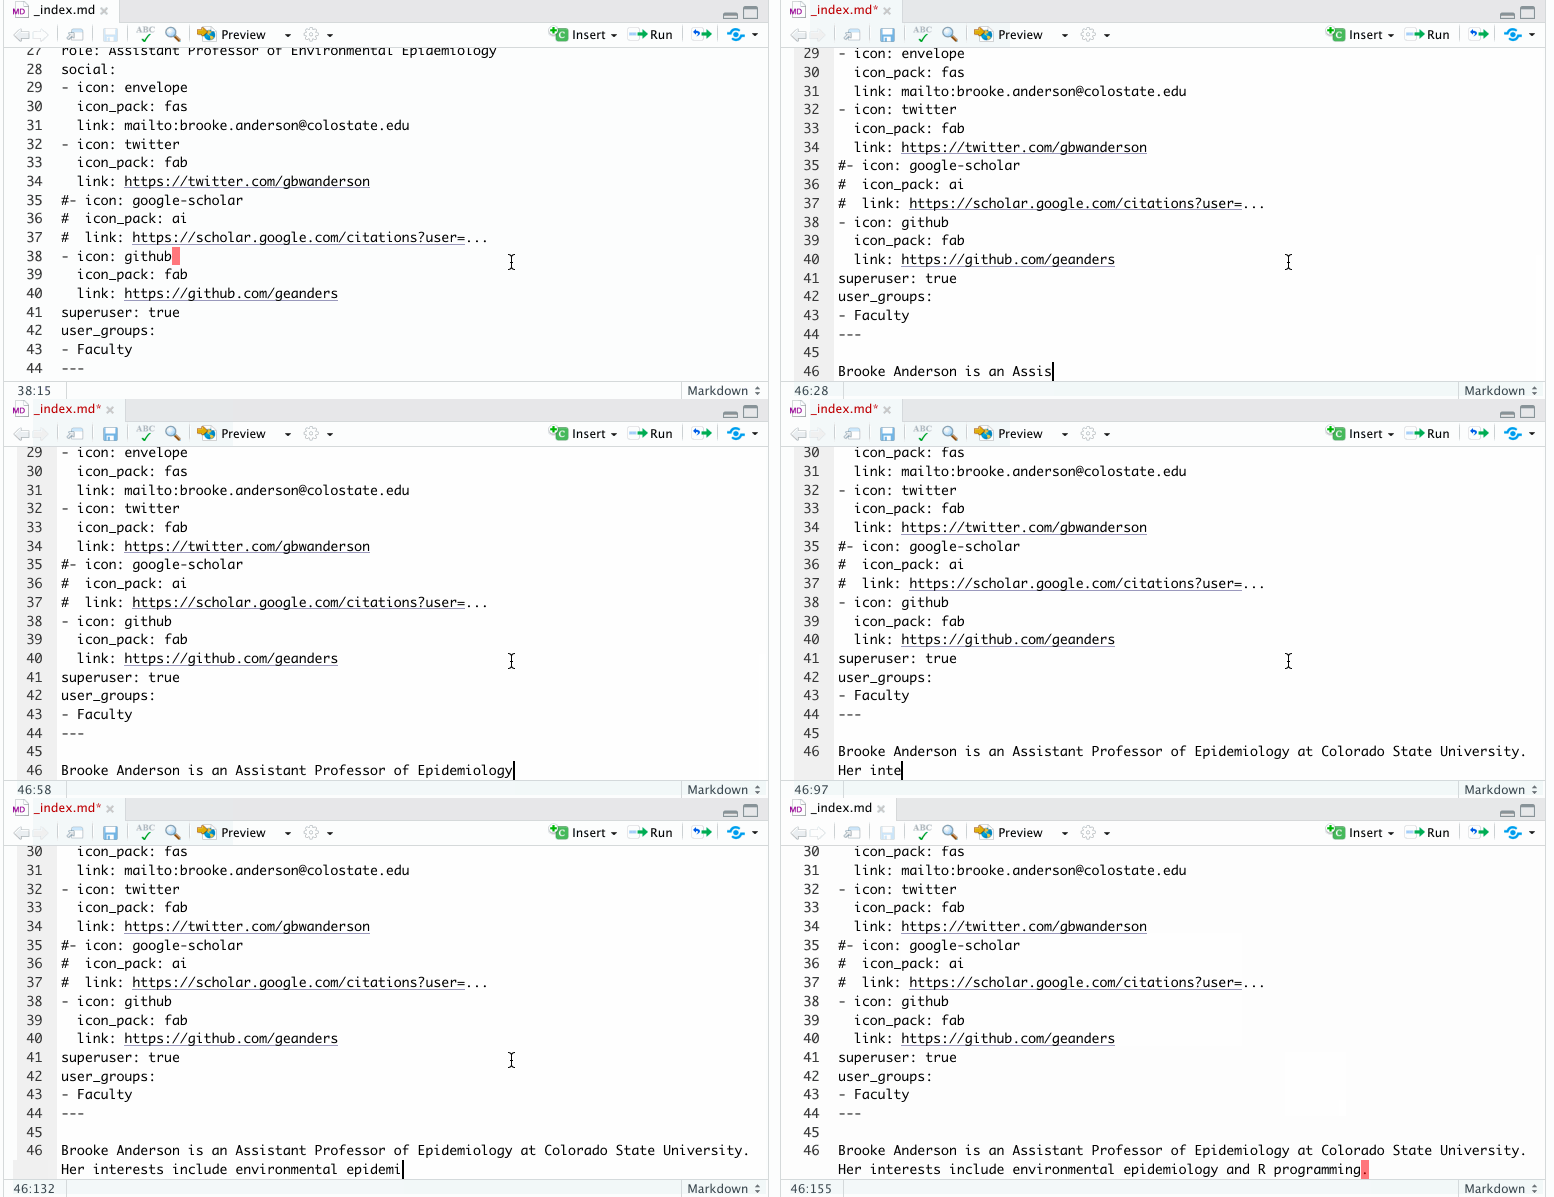
The very bottom of the file, under the ---, provides space for you to write
a paragraph summarizing who you are and your academic / research interests.
Be sure to save the file after you’ve made all your changes.
For an example of a completed "_index.md" file, you can see mine here.
Updating your avatar picture
There’s also a place in your author profile directory to include a photo to represent yourself. To change from the default (the blue guy), replace the “avatar.jpg” file in your author profile directory with the JPG of your choice, and use the same file name (“avatar.jpg”).
It would be helpful for you to use a photo of yourself, since that will help us put names with faces, but if you don’t have one or would prefer not to use your own photo, feel free to pick any photo (for which you have appropriate permissions) to use.
You might need to crop your photo some to get it to show up in the circle on the website correctly. Try with your uncropped picture once, check the website in the RStudio Viewer pane to see how it looks, and then if it doesn’t work, play around with cropping it until you’re happy.
Submitting your updates
Pushing the commits back to GitHub
When you are ready to push all the changes you’ve committed to your local branch, you can do this from the Git pane in R Studio. In this pane, there are two arrows: a green up arrow and a blue down arrow. Click on the green up arrow to push the commits from your computer (the local branch) to GitHub (the remote branch). Visit your GitHub page for the repository (or refresh it if you already had it open) and check if your changes have successfully been pushed to the remote branch.
If you haven’t created an SSH key and shared it with GitHub, you may be asked for your GitHub password every time you try to push. This will get to be a pain, so you’ll probably want to set up an SSH key. For more on how to do this (as well as other help with using RStudio with version control), check out RStudio’s help documentation on the topic.
Requesting that we pull your changes
At this point, you’ve made changes, checked them, and pushed them to your GitHub version of the repository. Remember, though, that you forked the repository from our original one, and so you’ve been working with a copy of the repository this whole time, rather than changing our original version.
To get your changes incorporated into our original version, you’ll need to request that we pull your changes into the original repository. To do this, you can submit a pull request through GitHub. Go to the main page for your fork of the GitHub repository and look for a button that says “New pull request”. When you click this, it will walk you through making a pull request. You’ll have a space to write a message describing the changes you’re recommending in the pull request.
If you’d like more details on this information, GitHub has help documentation on pull requests.
